Modelling process - Magdalene
Base Maya Model -
Originally i wanted to make the base for my model out of Zspheres, i brought in my Orthographic drawing from the previous post into Z brush by first selecting the draw tab, front back option, map 1, and importing my texture. This gave me a guide to where i need to put my z spheres, from here i then clicked the simple brush option, brought in a z sphere, and moved and scaled it to my desired location. I found that the end product that i got from doing this was not what i wanted, and i found it really difficult to place the spheres in a manner that matched my orthographic so i decided to take a different route to make my base model. I made an image plane on maya to show my orthographic and then went on to model over it using extruded cylinders and spheres for the main blocks of the body, i didnt bother making the hood part of the head nor any of the details because i figured it would be better to make them in zbrush, at this point i wasn't really sure how i was going to make the hood part of the head, but i thought i could probably figure something out using the tools we have learnt so far. Once i was happy with my base model, i first combined all my objects, then exported it as an OBJ, moved over to Z brush and imported it as a new subtool. At a later date, if i have time, i will try to use the Z spheres, but as i couldnt get the Symmetry to work, and none of the online resources were helping me, i thought that using the maya method may save me some time. |
| This is my final Maya base model. |
Zbrush Model -
Bringing it into Z brush i found my model was quite low poly and upon trying to smooth it out i had quite a lot of difficulty getting rid of the squares that were present when i modeled this base in maya. To fix this i used the Z remesher tool and picked a slightly higher resolution to add in more geometry, i did not pick too high of a number at this stage so that i could block in the bigger elements easier and up the geometry later to add in more finer details. A higher resolution model will be much harder to smooth out any large transformations.

Sculpting the mouth Part 1 -
I initially started out sculpting the mouth on my model, which i did by first blocking out the shape of the mouth, then using the inverted standard brush tool to push in the face just slightly, this will form the teeth area. I then tried using the dam standard brush to create the mouth opening, once i had done this, i defined the teeth a little more. I did notice that using the dam standard brush meant that i had some strange lumps in the mouth area, and i was frustrated not being able to smooth these out, so for now i reverted back to a previous save to work on the body as a whole, and leave the head until last so that i could think over how i might go about modelling the mouth and the headpiece.


Detailing the model -

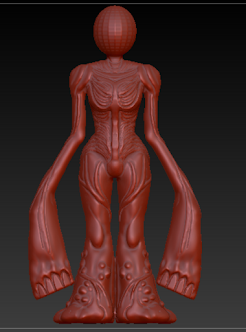
To create a good base to work off of, i used the smooth tool to smooth out all of the squares that were on my model, then used the standard brush along with the clay buildup tool to create the chest, define the hips , elbows, clavicle, shoulder, knees, and thighs more, then blended everything together. I will note that when i used dynamesh to add in more subdivisions, it joined the legs together, i should have in theory used Z remesher instead of dynamesh but this was just something i forgot to do at the time. I do manage to fix this issue later on, but from screenshots here onwards the legs are joined together. I thought it would be easier to add in all the details first, then deal with the legs last so that I'm not risking this happening again.

Going back in with the clay build up tool, i placed in the bone like elements that frame the chest and lead down into the pelvis, i made sure to change the focus on the brush so that my lines would not have that much of a gradient on them, once i was happy, i smoothed them down, then used the pinch brush and the dam standard tool to add more definition between the base of the body and the bone elements. As i plan to have quite a lot of texture on this model, having that clear definition between the detailed muscle parts and the smooth bone parts will help my model be much easier to read.


Here is a closer look at the muscle grain on the model, this is matched on the back side also, i also tried to make the shoulders resemble the deltoid muscle, adding on the grain to further push this illusion.


Moving back to the face, i used a similar technique to how i started out, however instead of using the dam standard tool, i selected the area i wanted to push back, and used the move tool to more neatly and accurately push this plane back into the head. With a bit of smoothing, and pinching the edges of the teeth, this gave a more defined shape and looked more like my reference image. I also added some definition to the gums to really make it read better as teeth. I then masked out where i wanted the holes in the veil to go, and much like i did with the mouth, moved them back into the sculpt.
This was where i initially left the model, below is the full turnaround screenshots that i took. However looking at the tools i used to make this, i felt i should try to demonstrate more techniques that i have learnt in class, as such i made a slight alteration to my original design and decided to add two large vein tassels onto her back to demonstrate the use of the curve brush tool.

Curve brush -


Separating the legs -

Posing my model -
I generally did feel like my model was finished at this point, however i had some time before submission so i thought i would push myself to try to pose my model. i wanted her to look like she was stepping towards someone about to swing at them. As i havent rigged my model yet, i had to do this by masking areas i wanted to mode, and using the move tool to bend them into shape. This caused a lot of changes in my model which was scary at first to see, but i knew if i just moved the model to where i wanted it to be, i could use the brush tools to help smooth my model out again. I tried my best to get it to look similar to how it was before, i added a little more definition to the arm that is swinging forward just to imply a presence of muscle, and tried my best to smooth out the areas that got warped in my transformations. I was able to fix most things, but admittedly i wasnt able to fully fix the head veil as it appears jagged around some areas. In future i might consider either using IMMs to create the veil, such as using a capsule, or even modelling the veil in maya and brining it into Z brush, that way i have a solid starting point as opposed to just extruding the head of the sculpt. I am very happy with the pose however, and i feel it added a bit more life to the model.
Youtube link - https://youtu.be/8mXvN7KC9u8
Final model turn around -
Finally i also took a screen capture of my base model to show a full turn around.
Youtube link - https://youtu.be/8mXvN7KC9u8
Evaluation -
On a whole i found making this model quite difficult at times, however i tried to make use of online resources and problem-solving to try to get around some tricky areas of my model. Comparing my model to my 3D artist i certainly don't feel i would have been confident enough to go about replicating his style of modelling by using a lot of subtools, however i tried to utilize his more stylistic and exaggerated proportions especially in the quite feminine model and the unique silhouette. In terms of showing off all of the skills i have learnt in zbrush so far, i struggled to think of where to use deformers or the more hard surface modelling elements of Zbrsuh, i did play around with the extract function, and whilst i didnt get any screenshots for this model i see how useful it could be for making clothing, and it has inspired me to want to try out modelling some clothing elements on another model in the future. I found the brush tools, and the curve brush function to be the most helpful elements, and i also tried out the scale, move and rotate tool to help me in posing my model, which was tricky to get ahold of at first as i had to keep locking and unlocking the placement and rotation of the gimbal which was causing my model to not move how i wanted it to, but i think in the end my model turned out alright and looks quite similar to the concept art i created. To make my model better in the future i would probably have a look at some muscle references on the side, as i think a more defined musculature structure would sell the meat and biological theme much better.
2nd 3D model -
As I had some time before this project was due in i decided to make another 3D model based on something i had been working on in my free time, I took a low Poly 3D model from Maya and brought it into z Brush in the hopes i could test out the extract tool and the curve brushes better. This is the design i was hoping to create alongside the original 3D model.

 |
| Here is my Maya model, the one i will be using is the one on the right. |
I removed the hair, belt and trousers so that i was left with only my base model and the shoes [I did not model any feet on the character originally] and then exported him as an OBJ to bring into Z brush. As the proportions were a bit off due to the stylization i had to use the mask and the scale/move options to make the head bigger and give the character some ribs. I then used the clay build up tool along with a muscle reference on the side to create the blocks for the muscles, i used the clay build up tool on the negative to push in the eye sockets and build up the nose. I did a lot of back and forth to build up the face, then the body, then refine the nose, realize i didnt like the face so i had to smooth it out, and then back to the body again. I then realized i made the arms way too buff looking so i had to use the inflate deformer and slide it into the negatives with only the arms selected to shrink down the size a bit, this then meant i had to go back in and redefine the muscles again. I had a lot of trouble with the arms and hands and i think you can tell that i don't fully understand the structures well enough [this is something i have been trying to improve upon]. On the other hand i found the chest and back to be much easier to sculpt. I also used the IMM spheres to create the eyes, then had them on a separate polygroup to add in more geometry with the Z remesher tool so i could hollow out the irises. I must have accidentally used the dynamesh function at some point because i noticed far too late to fix it that i had lost a lot of definition on the body , and i could not figure out how to up the polycount again, i was very upset with this because the body and face was starting to look somewhat alright. In the end i decided to step away for a bit and come back to this on thursday with a fresh set of eyes, i think overworking something can lead you to kind of become blind to the solutions to your problems and instead just leave you frustrated, but i dont think this model looks too bad. I certainly don't like it as much as my original model but i think it will look a lot better when i add the clothing.
 |
| Here is the turnaround at this stage. |
Turnaround without hair - https://youtu.be/VFg24YcY6vI

Final Turnaround - https://youtu.be/eTD7lsu3TxY
For the clothing I used the extract tool to first extend my masked area to imply fabric, i then used the pinch, clay buildup, and dam standard tool to define the wrinkles, waistband, seams and pockets. For the hair i first started out using the curve brush tool, however this did not give me the desired result, it was quite blocky and looked very cartoony. Instead i brought in the original low poly hair on my Maya model and imported it into Zbrush as a new subtool, i had to scale and move it around a little for it to look right. From there i had to smooth and pinch and use the dam standard tool to draw in the hair fibres. Now that i have the clothing and the hair on my model i like it a lot more than before, some areas i think i should improve on next time is the boots and face region of the model as these areas look the lest developed. I'm glad i made this model as it has allowed me to demonstrate more of the skills i have learnt in lesson.


Comments
Post a Comment