Maya Rigging part 2 [The leg Controls]
Following on from last lesson we first covered how to create controls that will be used to help move our character rig. To start out we need to select nurbs geometry/primitives. NURBS are very good to work with when it comes to animations as they do not show up in renders. To make the foot control, start by making nurbs circle, You can do this by entering the create tab, selecting NURBS primitives, then selecting circle. We will need to shape it to represent the foot, then hold down C and snap it under the bridge pivot. Hold down D and V and snap pivot to stabilizer
After you have done this, make sure you keep everything neat by deleting by type and selecting history, also make sure to freeze transformations [which is on the top row and looks like snowflake]. This just ensures everything is neat and easy to traverse. Now moving onto making the foot control more foot shaped we need to take into consideration Maya's selection preferences so that we ensure we are selecting the right thing, Maya's preferences go in this order : IKs select first, joints select second, and geometry selects third. To make sure we only select what we need, use the isolate select on the NURBS circle. From here we can simply select and drag vertices to make a foot shape.
Just like we did before, make sure to delete history and freeze transformations again. Just to note, if it wont let you freeze a transformation you may have accidentally pressed s which adds in keyframes for animation. We then need to rename NURBS circle to [L_Leg_CTRL]. From here, we should add in some custom attributes, this can be found under the edit menu in the channel box [on the right hand side] and there should be an option to Add attribute. Set the name to : Heel Lift and make this Keyable, we also need to specify the data type as floating points. There is also the option to set min and max numbers, we dont need this immediately as this will be done later on, it stops the rig from overextending. Once all looks like this image below, press the option ADD.Connecting control to groups
Under the Windows tab at the top find the general editors tab and then the connection editors. This will bring up a left display menu which is set to only show objects you can animate. There is also a button called From and To, be careful not to click this as it will swap your inputs and outputs. From should always be on the left, and to should always be on the right. Select in your editor expand rotate and translate, and then on your outliner select pirouette l_r. From here, reload left and right. On the right side display, untick show unkeyable just to make your space neater and easier to read, then connect pirouette L_R to rotate Y.
We will then need to do a similar process for the next couple of connections, here is the list of connections and selections:reload right
connect pirouette U_D to rotate X
select heel_lift
reload right
connect heellift to rotate X
toe_Group
reload right
connect toelift to rotate x
select heel_Tap
reload right
connect heel_Tap to rotate X
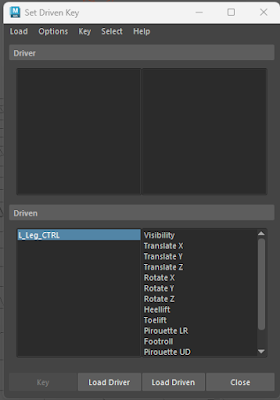
For the footroll, it is a little different as it requires animation to be able to do its function correctly, we will need to assign something called a Driven Key [or a driven piece of animation]. To do this change from your modelling/rigging menu to the animate menu. Along the top, find the Key menu, then find set driven key, then set, this will bring up a menu as seen below.
We have two options, Driver and Driven, a driver is the thing that is modified [control] whereas the driven is what is going to change [groups]. We need to load the control into the driver, then press load driver. From here, select select l-footroll-l and l-footroll-r group into the driven then l-leg ctrl select footroll. Then l-footroll-l and l-footroll-r select footroll, once you have done that you need to press the Key button. To add in the actual animation, select the [l-footroll-r] and set rotate Z to 30 degrees, and for the control, set the footroll option to -30 degrees. Key this, then go over to the windows tab and find the animation editor and graph editor menu. You will then need to make the curvy line straight by dragging over all points make linear tangent, this will ensure your animation plays smoothly at a constant speed.
Back under the connection editor, put the [l_leg_ctrl] on the left and the [l_foot_grp] on right, you then need to connect all translates together so that it looks like the image below.
Pole Vectors
Hip Control
To make a control for the hips, create a circle NURBS around hips making sure to put the pivot point in center of hips. We will then need to rename this to [C_Pelvis_CTRL]. As always, make sure to freeze transformations. We will then need to go back under the constraints menu and find two different types of constraint, the Point constraint, and the orient constraint. Select the joint first the apply a point constraint with the maintain offset on, the do the same with the orient constraint making sure to apply both. This will now let you move the hips of the rig up and down, rotate it, and move it from side to side. Finally make sure to cleanup your controls, especially scale and visibility as these won't be needed.
Here is the rig so far.


Comments
Post a Comment