Z brush Introduction and skull project

^ The lightbox menu contains a list of your primitives and bases for you to sculpt on top of, to close this menu you need to press the , button. [comma]
It is best to start out using the Poly sphere from lightbox tool menu, to bring it into the workspace click the icon for Poly sphere then drag the cursor across the grey central box.

^ To be able to sculpt on top of your shape, make sure edit is clicked on at the top, both the edit and draw button should be orange.

^ Black icon in the top left hand window silhouettes your sculpt, this can be helpful to see what you have been sculpting. Much like maya, Spacebar brings up shortcut menu which contains all your tools you might frequently need to use.


^ Before sculpting you should also use the Make Polymesh3D tool which deforms the geometry of a sculpt to best optimize it.

^ Focal shift [Circled in lavender] alters where the intensity of the brush is centred, a larger focal shift will make larger and more intense changes whereas the smaller focal shift will be a more gradual change. Draw size [Circled in blue] alters the size of the brush used, and Z intensity [Circled in red] alters the total intensity of the brush, this changes how quickly and how extreme changes made to the sculpt will be. These options are at the top of the screen and are the brush settings, however these can also be accessed through the Spacebar.
The shortcut to change brush size is S, and if you wish to push the brush inwards press the ALT key. Smoothing an area can be done with the shift key, to alter how fast the smoothing is done, alter the Z intensity in the brush settings.

^ Using the B button will bring up the brush menu which details all available brushes.
BPI will bring up the pinch tool, BST will bring up the standard tool, to navigate most of Z brush you should use the codes beginning with B.

^ If you want to undo the primitive you have started out with, deselect the edit button so that only the draw button is selected, then press CTRL z to remove the sculpt.

^ You can activate symmetry through the transform tab, this can be snapped above the tool tab on the right hand side for easy access. The transform tab also includes buttons for the move, scale and rotate tool.


^ https://pin.it/2e5P9yuzO For the task to model a human skull this is one of the references I will be using, it has a front, side and back profile.

^ https://www.deviantart.com/synthesys/art/Skull-Study-534185878 I might also use this reference as it has more variation of views with a 3/4 angle.
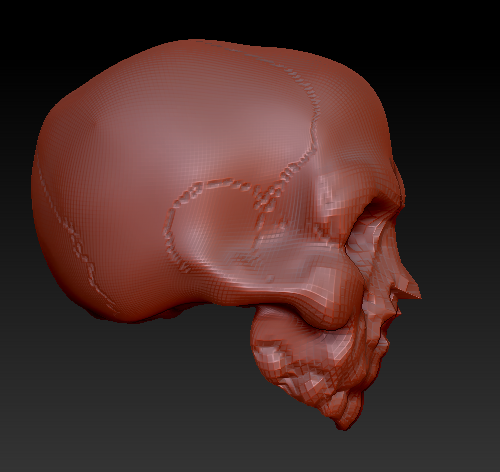
I first used the BMV [MOVE] option to create the base shape of the skull, just very roughly plotting out where the upper jaw would go. I made sure to change on the left hand menu the Dots option to freehand so that I would get a smoother sculpt. As well as this I made sure to turn my symmetry on so that both sides of my skull would be the same. Painting out a mask using the control key I selected the areas on the skull that I did not want to change, then using the CTRL ALT key I erased the areas where the eyes were going to go. Then I used the brush, inverted brush and smooth tool to push and pull areas of the sphere to mimic my reference. I had some trouble around the nose and teeth area especially with trying to get everything to look smooth but I think this may have been partly due to the fact the base sphere is relatively low poly. I am most happy with the eyes and the cracks in the skull.


Comments
Post a Comment